Pages - Menu

2014年1月29日 星期三

Dried cranberries Nougat 紅莓乾鳥結糖


香港人叫的鳥結糖名字來源於英文的nougat,但另外亦有人叫牛軋糖。話說名朝有位狀名元得到讀書之神文昌帝的托夢連中三元,這位狀元爲了感謝文昌帝,用麥芽糖,花生,米等造成牛模樣的糖果獻給天神,取名牛軋糖。不過由於太花時間做成牛的模樣,所以現今的牛軋糖形狀都較簡單,但我相信現今的味道一定較以前更豐富,更多花款。新年除了天神無意跌入凡間的禮物外,都可以試下凡人獻給天神的糖果。

材料(可以做25條):

  • 杏仁 80g (可以用其他果仁代替)
  • 紅莓 25g
  • 水 25ml
  • 砂糖 65g
  • 水麥芽 125g
  • 鹽 1/8 茶匙
  • 蛋白 17g
  • 牛油 30g
  • 奶粉 45g 

最緊要一早準備好所有工具及材料,温度計必須,而且要快手一次完成所有動作。

1.首先將杏仁烤熟,150度烤約15-20分鐘。
2.將水麥芽,砂糖,水放入小鍋中,煮至130度。鳥結糖的軟硬取決於糖水的温度,温度太低就會太軟而且不能成形,温度太高就會太硬,不過如果你喜歡吃很硬很硬的那一種就可煮耐一點但不要過140度。130度我個人覺得剛好,不會太軟又不會太硬,而不不黏牙。
3.在煮糖水的同時間,要打發蛋白至挺立。如果怕自己手忙腳亂可以先打發好蛋白霜,再一路煮糖水,因爲蛋白霜可以等,但糖水不可以等,到了需要的温度就要用。
4.糖水煮到130度慢慢加入蛋白霜中,同時間一路攪拌蛋白霜令兩者混合,動作要快。如果你有大型電動攪拌器又而且做的份量多,就可以自己一個輕鬆完成。但如果不是,你需要另一個幫忙倒糖漿又或者攪拌的動作。

5.預先坐溶牛油,因爲當完成糖水加蛋白霜的動作後,牛油液要立刻加入攪混。
6.再加入奶粉,快手拌勻。再加入杏仁及紅莓乾。如果覺得很稠是正常的,要大力點就可以。
7.將所有倒在牛油紙上又或者可以倒在鋪上牛油紙的烤盤上,鋪上另一張牛油紙,用麵棍壓平表面。另外可以用刮板/手修正好側邊的線條。放雪櫃雪硬切條。
8.吃不完的鳥結糖可以用用烘焙店專用的鳥結糖紙又或者用普通牛油紙包好放密實盒。

Ingredients 25 pieces:

  • Almond 80g (you can substitue by other nuts)
  • Dried cranberries 25g
  • Water 25ml
  • Sugar 65g
  • Maltose 125g
  • Salt 1/8 茶匙
  • Egg white 17g
  • Butter 30g
  • Milk powder 45g 

1.Bake almond in the oven 150 degree for 15-20 minutes or until it is cooked.
2.Put maltose, sugar, water into a little pot and heat until it reaches 130 degree. The texture of the nougat depends on the temperature of the syrup. If it is too low, then the nougat will be very soft and if it is too high then the nougat will be very hard. If you really like those are very hard, then you can heat the syrup a bit longer but not exceeding 140 degree. Personally, I think 130 is alright, not too hard and not too soft, chewy but not sticking to your teeth.
3.While you are heating up the syrup, you have to beat the egg white until stiff peak. If you worry that you cant handle two things at a time, you could prepare the egg white first because the egg white can "wait" but the syrup cannot "wait". Syrup has to be used immediately when it reaches certain temperature you need.
4.When the syrup reaches 130 degree, you pour it slowly to the egg white and at the same time you have to stir the egg white and syrup mixture quickly until they are combined. If you have a big mixer and you are making big proportion, you could handle it yourself. However, if you not, you would need help on pouring syrup or stiring.
5.Prepare the melted butter first, when the meringue is done, you have to add the melted butter immediately and stir.
6.Add milk powder and mix quickly. And then add the almond and dried cranberries and mix. It is normal that the mixture is sticky.
7.Pour all the mixture onto a parchment paper or onto a mold with parchement paer, put another parchment paper on the top to cover it. Use your rolling pin to flatten the surface. And you could use a spectular or your hand the sides so that they look like a square or retangular.Put the nougat into the fridge and chill until they are harden.
8.You could use the candy sheets to wrap the nougat or just use parchment to cover it to prevent they stick together. Any unfinished nougats need to be put that into a sealed box.

2014年1月27日 星期一

Taro balls 芋圓


想吃湯圓但又怕肥?新年可以試試芋圓地瓜圓,芋圓地瓜圓本身更不用放糖,煙煙韌韌,台灣人所謂的QQ。

可自行按比例調整份量

材料:

蕃薯味(約315粒)
  • 蕃薯/地瓜 455g
  • 木薯粉 175g
芋頭味 (約300粒,每粒2g)
  • 芋頭  500g
  • 木薯粉 100g
糖水:
  • 片糖/冰糖/黑糖 適量
  • 水 適量
  • 薑片 少許
*由於每個芋頭及地瓜的水份都不同,木薯粉的份量作參考,建議分兩至三次加粉,如果粉團很濕就再加粉,如果粉團乾就加點水,直至搓到一個不粘手的粉團。由於我做的時候地瓜的水份較多,所以下木薯粉的量較芋頭的多。


1. 首先將芋頭及地瓜切件蒸熟。
2. 用叉子壓爛至溶。
3. 加入木薯粉用手混合及搓成團。

4. 將芋圓地瓜團分成條狀,再切成細條粒。如果做的有多不能夠一次吃完就將芋圓及地瓜圓面撒少少粉,防止黏在一塊。再放入冰隔雪,雪好入袋。
5. 加薑片煮滾水,加入糖,再放芋圓地瓜圓,大概2-3分鐘就煮熟。

Ingredients:

Sweet Potato (around 315 balls)
  • Sweet potato 455g
  • Tapioca flour 175g
Taro (around 300 balls,2g each)
  • Taro  500g
  • Tapioca flour 100g
Sweet soup:
  • Brown sugar / crystal sugar  
  • Water 
  • Ginger slices  little
*As the water content in each of the taro and sweet potato is different, the amount of tapioca flour here is for reference only and it is suggested to add the flour by 2-3 times. If the dough is very moist, then you add more flour and if the dough is very dry you may need to add some water. Rub until the dough is not sticky. Since my sweet potato is much more moist than the taro, so I add more flour to the taro.

1. Cut the taro and sweet potato into pieces and steam until soft. 
2. With the help of the fork, press until they become mashed taro and sweet potato. 
3. Add tapioca flour and mix and rub until they form a dough.  
4. Roll the dough into a few rolls and cut them into pieces with each around 2g. If you can't finish the taro balls and sweet potato balls immediately, you can spread some flour on the balls to prevent them from sticking together and then put them into the freezer. Once they are frozen, you could store them in a bag or box.
5. Add ginger to the water and heat to boil, add sugar, and put the taro and sweet potato balls into the water. It takes around 2-3 minutes to cook.

Chinese Turnip cake 大根蘿蔔糕


原本打算買普通蘿蔔做蘿蔔糕的,但事源前一晚在一間日本餐廳吃到很清甜無根的大根就打算買兩條大根試試。因爲我的蘿蔔糕有粗糼兩種不同的厚度,所以可以吃到絲絲的蘿蔔。

可以做一底(底15cm 直徑,面20cm直徑,高7.5cm)
加一個普通的長方形焗盤 (16cm x 7cm x 6cm)

材料:
  • 大根蘿蔔 2.5斤/ 1500g 
  • 粘米粉 166g 
  • 馬蹄粉 84g 
  • 臘腸 2 條
  • 蝦米 15-20粒
  • 冬菇 4-6 粒
  • 瑤柱 適量
  • 水 225ml (來自浸冬菇水及大根自身的水)
  • 糖 1茶匙
  • 鹽 適量
  • 古月粉 適量


1. 首先將蝦米及冬菇浸軟切粒,保留水煮蘿蔔。臘腸及瑤柱隔熱水蒸軟,臘腸切粒,瑤柱撕成碎。
2. 大根一半刨成絲,另一半切粗條,大概半條手指尾的粗度。


3. 開火,燒紅鑊下油,將蝦米,冬菇,臘腸及瑤柱爆香,炒至材料令身備用。
4. 不需要洗鑊,將所有大根連水下鑊,加入150ml 的冬菇水,再加入一茶匙的糖,鹽及古月粉,要試味去配合自己的口味,煮至大根軟身及轉透明即可。
5. 將鍋內的水全部取出,因爲煮蘿蔔時會出水,所以即使加了150ml 的水,仍會比之前的份量多。取出的水要225ml ,有多的不要,可以留來煮其他菜,不夠的話可以再加多少少浸冬菇水。
  

6. 將蘿蔔水加入粘米粉及馬蹄粉開至無粉粒的糊狀,可以用隔篩以確保粉漿無粉粒。
7. 再開慢火,加入粉漿,炒至粉漿跟蘿蔔充分混合及收乾水就可以熄火。
8. 倒入抺有少許油的盆內,輕輕壓平表面。
9. 大火隔熱水蒸約1小時,如果插入牙籤而沒有任何東西黏住就可以。

Mold size:
1 round mold with base diameter 15cm, top diameter 20cm and height 7.5cm  and
1 rectangular mold with 16cm L x 7cm W x 6cm H

Ingredients:
  • Japanese turnip 1500g (you could replace by chinese turnip)  
  • Rice cake flour 166g 
  • Water chestnut flour 84g 
  • Chinese sausage 2 
  • Dried shrimps 15-20 
  • Dried mushroom 4-6 
  • Dried scallop little
  • Water 225ml (from the turnip and the water for soaking the mushrooms)
  • Sugar 1 teaspoon
  • Salt  little
  • White pepper little
1. Firstly, you have to use hot water to soak the dried shrimp and mushrooms so that they become soft to use and then cut them into small pieces. Don't pour away the water! Steam the Chinese sausage and scallop to soft and cut them into small pieces as well. 
2. Peel and grate the turnip, half of them are grated into thinner slices and the other half are grated into thicker slices. Thicker slices are about half of the little finger.  
3. Turn on the fire, heat up with some oil, put the dried shrimps, mushrooms, sausage and scallop into the wok and stir fire until you can smell the aroma and the ingredients looks glossy.
4. Do not clean the wok and put all the turnip into it add 150ml mushroom water and 1 teaspoon of sugar, some salt and white pepper. You have to try to optimize your own flavor. Cook until the turnip turns transparent. 
5. Take all the water out from the turnip. Although only 150ml mushroom water is added, turnip will release some more water when you cook and so we will have more than 150ml water. Total we need 225ml. If you have extra then you could use that for cooking and if it is not enough, then you add some more water from the water you soak mushrooms before. 
6. Add 225ml water to the two flour and mix until smooth.
7. Turn slow heat, add the mixture and mix well with the turnip. You can turn off the heat when it is well combined and it is not watery. 
8. Put it into a lightly oiled mold and smooth the surface. 
9. Steam for around 1 hour. 

2014年1月26日 星期日

Chinese new year coconut cake 鮮椰汁年糕


每次放工經過灣仔春園街的一間老字號椰子專門店,我都想到用新鮮椰漿做年糕一定會好吃,終於讓我等到過年可以買回家試試。新鮮椰漿真的很清香,待涼一晚再煎一煎,煙煙韌韌。

另外,澄麵經常在中式點心中用到,例如做蝦餃皮,在年糕中主要用途令年糕硬身,而且煎的時候可以容易煎,另可以根據自身的口味加減澄麵,加多少澄麵就要減多少糯米粉,當然不能夠全都是澄麵。

可以做一底(底15cm 直徑,面20cm直徑,高7.5cm)
但我用了兩個普通的長方形焗盤 (16cm x 7cm x 6cm)

材料
  • 鮮椰椰漿 600ml /一斤 (或可以用普通椰漿代替)
  • 牛奶 185ml 
  • 砂糖 200g (甜度相對低,如有需要可以加)
  • 糯米粉 370g 
  • 澄麵 185g 
  • 油 2 湯匙 

1. 煮熱牛奶,加入砂糖煮至溶解。
2. 糯米粉及澄麵過篩2次(令攪拌的過程較容易),加入椰汁攪拌,慢慢加入熱牛奶及油繼續攪拌至順滑及無粉粒,如有需要可以過篩。
3. 倒入已抺油的盆中,用錫紙蓋好。
4. 先開大火隔熱水蒸(要確保有大量的水) 60-90分鐘。

Mold size: base diameter 15cm, top diameter 20cm and height 7.5cm /
2 rectangular molds with 16cm L x 7cm W x 6cm H

Ingredients:
  • Fresh coconut milk 600ml  (you can substitute by canned coconut milk)
  • Milk 185ml 
  • Sugar 200g (It is relatively less sweet and you could adjust yourself)
  • Glutinous rice flour 370g 
  • Wheat starch 185g 
  • Oil 2 teaspoon
1. Boil the milk and add sugar until it dissolves.
2. Sifted glutinous rice flour and what starch twice to make sure it is easier to mix with the liquid. Add coconut milk and stir, and then add hot milk slowly and stir until everything is well combined and smooth.
3. Put it into a lightly oiled mold and cover with aluminum sheet.
4. Steam for 60- 90 minutes.

2014年1月20日 星期一

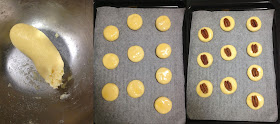
Chinese peacan cookies 合桃酥


新年就最多應節食品,無事在家中渡年時真的可以一天吃到晚。我會一連幾天陸續分享一些我喜歡的賀年食品,今天先做合桃酥。不要以爲中式糕點就一定很不健康,其實只要用牛油取替豬油,味道沒有太大影響之餘其實都可以吃得很安心。合桃酥非常之簡單,由預備到完成只是花你半小時。

可以做10塊

材料:

  • 低筋麵粉 75g
  • 砂糖 40g
  • 室温牛油 30g
  • 梳打粉 1g
  • 雞蛋 半隻 (另加少少掃在餅上)
  • 合桃 10 粒


1. 打軟牛油,加入低筋麵粉及梳打粉過篩,加入砂糖混合。
2. 加入打勻的雞蛋攪混成麵團。
3. 分成10粒,輕輕壓平成一個圓形,但不用太大力壓得得扁,掃上蛋漿,再放一粒合桃。
4. 放入預熱175度的焗爐焗10-15分鐘。


For 10 pieces

Ingredients:

  • Cake flour 75g
  • Sugar 40g
  • Butter 30g
  • Baking soda 1g
  • Egg half (plus extra for brushing)
  • walnut / pecan 10 
1. Beat butter until soft, add sifted cake flour, baking soda and sugar to mix. 
2. Add beaten egg and press until it forms a dough. 
3. Divide into 10 pieces and press into a small flat circle but it doesn't need too hard. Brush the surface with egg and put each with a pecan or walnut. 
4. Put it into the preheated 175 degree oven for 10-15 minutes. 

Tuna Bun (Sponge-Dough Method ) 吞拿魚包 (中種法)


我今次真的親手做一次包,過往都一直倚靠我的懶人恩物kenwood mixer幫忙,但今次要真實的搓搓打打幾百回後才做得一個麵團,不過手做有手做的快感。

今次做的是中種法,簡單說,中種法是做麵包的其中一種方法。一般做麵包食譜做的是直接法,要求首先將材料混合,搓揉成團,基本發酵,再滾圓中間發酵,整形及最後發酵一次過完成。而中種法就是經過兩次發酵而成的方法,首先將部的麵粉,水及酵母混合成團經過第一次發酵做成種麵團,之後再跟主麵團混合,再重覆直接法的做法。直接法需要的時間較少,較方便,但中種法做出的麵包發酵得更好,更鬆軟,保存期較耐,麥味較強。
材料:

中種麵團
  • 高筋麵粉 120g
  • 水 72ml
  • 速發酵母 3g
主麵團
  • 高筋麵粉 30g
  • 牛奶 30ml
  • 鹽 2.5g
  • 砂糖 12g
  • 牛油 7g
  • 蛋液 少許
吞拿魚餡:
  • 鹽水吞拿魚 75g
  • 熟粟米粒 50g
  • 沙律醬 適量
  • parsley 適量 

做法:


中種麵團

1. 麵粉,水及速發酵母用手混合,搓至沒有粉粒及成爲麵團。
2. 蓋上盒或保鮮紙,放在約30度的地方發酵。如果夏天做就可以放温內,如果冬天就要放在微波爐或焗爐內,加一杯熱水。時間大概爲1.5-2小時又或者令麵團發大至2倍大。

主麵團


1.  將中種麵團加上所有主麵團的材料在盆中混合(牛奶可以留約10ml及牛油稍後才放),用手攪拌至沒有粉粒的麵團。
2. 加入牛奶再搓令牛奶跟麵團充分混合。
3. 牛油切小塊,跟麵團混合再搓。
4. 捉住一部分的麵團,以打出去的方式向工作枱用力打出去,轉90度再打出去,一直打至麵團出現薄膜爲止,我打了200多下。
5. 滾圓麵團,滑面朝天,收口向下,放在抺有牛油的盆中,蓋上保鮮紙或盒發酵40分鐘。
6. 用手指測驗麵團,手指沾高筋麵粉,將手指插入麵團的中間,約數cm 的深度,如果沒有馬上彈回就代表可以。如果彈回就需要再發酵。


7. 取出麵團,桌上撒些高筋麵粉,麵團表面也撒少少,用手壓出大氣泡,磅重量,平均分5份,各自滾圓,蓋上保鮮紙靜置15分鐘。
 

8. 將麵團壓成一個約10cm 長的方形,兩邊各界一個角,但不要界斷,兩邊互相穿過就完成做型。
9. 再發酵約1小時成兩倍大。
 

10. 掃上蛋液,鋪上吞拿魚餡及parsley。
11. 放預熱175度焗爐焗15-20分鐘。

吞拿魚餡:
1. 鹽水吞拿魚澀乾,加粟米及沙律醬混合。


Ingredients:
 
Sponge Dough: 
  • Bread flour 120g
  • Water 72ml
  • Instant yeast 3g
Dough
  • Bread flour 30g
  • Milk 30ml
  • Salt 2.5g
  • Sugar 12g
  • Butter 7g
  • Egg little for brushing
Tuna filling:
  • Tuna 75g
  • Corn 50g
  • Mayonnaise  little
  • Parsley little
Direction:
 
Sponge Dough
1. Mix flour, yeast and water and rub until it forms a dough.
2. Cover it with plastic cling and put it into a area around 30 degree and leave it to rise. You could just leave it in the room temperature if you make it in summer. You have to put it into oven / microwave together with a cup of hot water if you make it in winter. It takes around 1.5-2 hours to double in size.
 
Dough 
1. Mix the sponge dough and all the ingredients from the dough (except butter and leave around 10ml of milk for later stage), rub until it forms a dough.
2. Add milk to the dough and rub until they are incorporated.
3. Cut butter into small pieces and incorporate with the dough.
4. Hold a corner of the dough, beat towards your working surface, turn 90 degree and beat it again, continue this process until the thin sheet is formed.
5. Roll the dough into a ball with smooth surface on the top put it into a light buttered bowl. Cover it with plastic cling and let it rise again for 40 minutes.
6. Use your finger to test the dough, stick your finger with some bread flour and put it into the dough around several cm depth. If the dough does not bounce back, it means ok. If the dough is very elastic and bounce back, then you have to let it rise for some more time.
7. Remove the dough from the bowl. Spread little bread flour on your working desk and some onto the dough. Use your hand to flatten the dough so that the big air bubbles inside could be released. Put the dough on the scale and evenly cut into 5 pieces. Rub the doughs into ball shape and cover them with plastic cling and let it cool for 15 minutes.
8. Flatten the doughs into a 10cm length square, cut 2 “L” shapes at each of the corner and cross them with each other.
9. Let it rise for another 1 hour to double in size.
10. Brush the dough surface with egg, put the tuna mixture and parley on the top.
11. Put it into the preheated 175 degree oven for about 15-20 minutes.
 
Tuna filling:
1. Mix tuna fish with corn and Mayonnaise.

2014年1月18日 星期六

Honey Cake 蜂蜜蛋糕


其實我很喜歡吃蜂蜜蛋糕,雖然只是普通的蛋糕,但加了蜂蜜又別有一番風味,很易吃了一塊又一塊。

今次做了一個8 "x 4"x 8cm 高的木架
如要加減份量,可以以一隻蛋做單位,例如做3 隻蛋份量就除2再乘3。
可以切8件

材料:
  • 蛋黃 2 隻
  • 蛋白 2 隻
  • 砂糖 26g
  • 砂糖 40g
  • 蜂蜜 18ml
  • 低筋麵粉 27g
  • 高筋麵粉 27g
  • 牛油 18g
  • 味醂 15ml (一種常用日本的調味料,可以在大型超級市場找到,平日煮菜也當放,例如做照燒雞扒)


1. 隔水加熱蜂蜜約40度。
2. 蛋黃加26g砂糖打發,慢慢加入蜂蜜,一直打發至淺黃色及出現紋路,可以用攪拌器寫"8"字的方法測驗,如果可以維持約2秒才消失就可以。
3. 加入味醂混合。
4. 低筋麵粉及高筋麵粉過篩,分兩次加入蛋黃糊中,用刮刀輕力拌勻。
 
5. 蛋白打發至起泡,砂糖分三次加入,一直打發至濕性泡發,即是蛋白霜的尾部向下垂。
6. 蛋白霜分三次加入蛋黃糊中。
7. 同時間,加熱牛油約80度。
8. 牛油分兩次加入至麵糊中輕力拌勻。
9. 倒入模中,放入已預熱175度的焗爐焗45分鐘,再轉150度焗15分鐘。(因爲我用的是木架所以焗的時間較長,如果你用其他的焗模例如鋁模等可以縮短至30分時間,金黃色後轉150度)。


I did a 8 "x 4"x 8cm height wooden mold.
If you need to adjust, you can use one egg as the base, for example, if you want to do 3 eggs, then you could divide by 2 and times 3. 

Ingredients:

  • Egg yolk 2 
  • Egg white 2 
  • Sugar 26g
  • Sugar 40g
  • Honey 18ml
  • Cake flour 27g
  • Bread flour 27g
  • Butter 18g
  • Mirin 15ml( a very common Japanese seasoning sauce ,you could buy in large supermarket,you can put it into savory dishes like chicken teriyaki)
1. Heat the honey in bain marie to around 40 degree. 
2. Add 26g sugar to egg yolk and beat, add honey slowing and continue to beat until it becomes thicken and light yellow color and ribbon stage. You could test by writing "8", if it could last for 2 second, then it should be ok.  
3. Add mirin and mix。
4. Sift the cake flour and bread flour, add to the egg yolk mixture by twice, fold in the flour to the mixture gently until incorporated. 
5. Whisk the egg white to bubble stage, add sugar by three times, beat until soft peak. 
6. Add 1/3 of the meringue to the mixture and mix and combine the rest by two times, combine them gently.
7. Heat butter in bain marie to around 80 degree at the same time.
8. Add butter by two times to the mixure and mix. 
9. Pour it into the mold, put it into the preheated 175 degree oven for 45 minutes and turn to 150 degree for 15 minutes. 


2014年1月17日 星期五

Hong Kong Style sausage bun港式腸仔包


早晨! Happy Friday!!! 繼續港式麵包系列,小學有很多時候都吃腸仔飽做早餐又或者當小息茶點 。

可以做5個

主麵團:

  • 湯種50g (可以參考這篇
  • 高筋麵粉 145g  
  • 速發酵母 3/4 茶匙 
  • 雞蛋 半隻 
  • 砂糖 23g 
  • 牛奶 40ml 
  • 牛油 15g 
  • 奶粉 5g 
  • 香腸 5條 
  • 蛋黃 少許 (掃在麵包上)
1. 麵包外皮麵團做法請參考上一篇
2. 第一次發酵完成取出麵團,桌上撒些高筋麵粉,麵團表面也撒少少,用手壓出大氣泡, 磅重量,平均分5份,各自滾圓,蓋上保鮮紙靜置15分鐘。

3. 壓平麵團再捲成長條,包住香腸約三至四個圈,進行第二次發酵約1小時。
4. 在包上掃上蛋液兩次,放入預熱180度的焗爐焗13-15分鐘。

Ingredients
Main dough:

  • Tangzhong 50g (go to this for details) 
  • Bread flour 145g  
  • Instant yeast 3/4 teaspoon 
  • Egg half 
  • Sugar 23g 
  • Milk 40ml 
  • Butter 15g 
  • Milk powder 5g 
  • Sausage 5 
  • Egg yolk little (for brushing on the bread surface ) 
1. For the dough, please go to the last entry for details.
2. Remove the dough from the bowl. Spread little bread flour on your working desk and some onto the dough. Use your hand to flatten the dough so that the big air bubbles inside could be released. Put the dough on the scale and evenly cut into 5 pieces. Rub the doughs into ball shape and cover them with plastic cling and let it cool for 15 minutes.
3. Roll the dough into a long string and surround the sausage around 3-4 circles, and let the dough to rise for the second time. It takes about 1 hour.
4. Brush some egg yolk on the top and put it into the preheated 180 degree oven for 15-20 minutes.

2014年1月15日 星期三

Hong Kong Style pineapple bun 湯種菠蘿包


假若有一天我身在他鄉,我想我一定會想念香港的菠蘿包,所以我要務必在這一天來到前做到菠蘿包以解我他朝相思之苦。近年,香港的麵包店很流行一種叫湯種的麵包,其實所謂的湯種只是做麵包的一種方法。湯種做出的麵包特別鬆軟,輕身,而且放上兩三天對口感都沒有太大的影響。湯種的原理簡單來說就是麵粉加上熱水煮成糊,在這個過程中麵粉吸進大量的水分令麵團產生柔軟的質地。據說湯種麵包是日本人發明再引入日本的便利店再傳到其他的東南亞地方,但又有其他的說法其實中國老早就用這個方法去做麵條,其實是後來才傳到日本,這令我想起很多的食物起源都據說由中國人發明例如意粉,壽司等等...Anyways, 今天要做湯種菠蘿包。

可以做5個

材料

湯種:
  • 水/牛奶 125ml 
  • 高筋麵粉 25g 
1. 加熱至糊狀,離火後蓋上保鮮紙,要緊貼麵糊防止結皮,放雪櫃冷藏。
2. 這個份量可以作2-3次用,如果要調節份量,可按比例加減,只要保持粉跟水的比例爲1:5 就可以。每次要用前先放室內回温約30分鐘到一小時,麵糊可以保存3-4天。


菠蘿脆皮:
  • 低筋麵粉 44g 
  • 牛油 23g 
  • 砂糖 25g 
  • 蛋黃 4g 
  • 牛奶 6ml 
  • 食用臭粉 1/8 茶匙 (可以在烘焙店買到,作用可以令脆皮變成不規則的紋路,如果不喜歡也買不到可以不放) 
  • 梳打粉 1/8茶匙 
1. 牛油用刮刀壓至軟身,加入其餘材料拌混成團。
2. 用保鮮紙泡好捲成長條入雪櫃雪至硬約30分鐘。
3. 將材料分5份,壓平備用。

主麵團: 

  • 湯種 50g 
  • 高筋麵粉 145g  
  • 速發酵母 3/4 茶匙 
  • 雞蛋 半隻 
  • 砂糖 23g 
  • 牛奶 40ml 
  • 牛油 15g 
  • 奶粉 5g 

1. 除牛油外,將所有材料連湯種倒入電動攪拌器(保留約10ml 液體後加),先用低速打約2-3分鐘至沒有粉粒,再用中速打2-3分鐘成一個完整的麵團,中途慢慢加入保留的液體,每次加液體時要先轉低速攪拌再轉中速打,一路加液體打至麵團十分柔軟。
2. 加入牛油,先用低速打1-2分鐘,待牛油跟麵團融合後,再轉中速打成有薄膜而不破爛的麵團,打25-30分鐘,中途要不時停機將黏在勾上的麵團刮下來再攪拌。時間每人都不同,重要的是形成薄膜。
3. 取出麵團滾圓底部向下,放置在抺上少許油的大盆中進行第一次發酵,蓋上保鮮紙,防止麵團表面吹乾,保持發酵的温度在28度左右。如果是夏天可以放在温室發酵,但如果冬天發酵就要放入微波爐加一杯暖水,令麵團保持在一個温暖的環境下發酵,如果水涼了就換另一杯取代。發酵時間大概1-1.5小時,發至原本麵團的2倍大。
4. 用手指測驗麵團,手指沾高筋麵粉,將手指插入麵團的中間,約數cm 的深度,如果沒有馬上彈回就代表可以。如果彈回就需要再發酵。

5. 取出麵團,桌上撒些高筋麵粉,麵團表面也撒少少,用手壓出大氣泡,磅重量,平均分5份,各自滾圓,蓋上保鮮紙靜置15分鐘。
6. 壓平麵團再滾圓,進行第二次發酵約1小時。
7. 每個包鋪上菠蘿脆皮,輕輕按壓皮的四周令脆皮緊貼麵包。
8. 在脆皮上掃上蛋液,放入預熱度的焗爐焗10-12分鐘。

For 5 buns

Ingredients
Tangzhong:
  • Water/ milk 125ml 
  • Bread flour 25g 
1. Mix together and stir, heat until it thickens. Cover it with plastic cling. It needs to stick to the mixture so that the mixture will not form a skin. Put it into the fridge.
2. This portion can be used for a few times. If you have to adjust the portion, you can adjust it proportionally as long as you can keep the ratio of the flour to water is 1:5. Put the mixture into the room temperature for 30 to 60 minutes before you use. This mixture can be stored in the fridge for 3-4 days.

Pineapple streusel topping :
  • Cake flour 44g 
  • Butter 23g 
  • Sugar 25g 
  • Egg yolk 4g 
  • Milk 6ml 
  • Edible ammonia powder 1/8 teaspoon (It could be bought in bakery supplies shop. It is used to form irregular pattern on the topping. If you don’t like it or you cannot buy, you can skip it.) 
  • Baking soda 1/8 teaspoon 
1. Beat the butter until soft, add the rest of the ingredients and mix until it forms a dough.
2. Use plastic cling to wrap the dough and roll it. Put it into the fridge for 30 minutes to solidify the dough. 
3. Cut the dough into 5 pieces and flatten each of them.

Main dough: 
  • Tangzhong 50g 
  • Bread flour 145g  
  • Instant yeast 3/4 teaspoon 
  • Egg  half  
  • Sugar 23g 
  • Milk 40ml 
  • Butter 15g 
  • Milk powder 5g 
1. Except butter, put all ingredients including the tangzhong into the mixing machine(keep 10ml of liquid for the later stage). Use a low speed to mix for 2-3 minutes until everything is combined. Use the medium speed to mix for 2-3 minutes until it forms a dough. During this process, add the remaining liquid slowly. Every time when u add liquid, turn to low speed first and turn to medium speed only after the water is well combined with the dough. Beat until the dough is very soft and smooth.
2. Add butter, use the low speed again and wait around 1-2 minutes until it is incorporated with the dough. Use the medium speed to beat the dough for around 25-35 minutes until the thin sheet is formed without breaking. While the machine is beating the dough, you have to stop the machine and clean the hook from time to time so that all the mixture is evenly kneaded. The key is to form the thin sheet.
3. Remove the dough from the machine, put it into a light buttered bowl and let it rise in warm place around 28 degree. Cover the dough by a plastic cling to avoid forming dry skin. If it is summer, you could let the bowl to sit in the room temperature. If it is winter, you need to put that into the microwave with a cup of hot water next to it to provide a warm and moist environment. If the hot water becomes cool, replace by another one. Let the dough to rise around 1- 1.5 hour or it doubles in size.
4. Use your finger to test the dough, stick your finger with some bread flour and put it into the dough around several cm depth. If the dough does not bounce back, it means ok. If the dough is very elastic and bounce back, then you have to let it rise for some more time.
5. Remove the dough from the bowl. Spread little bread flour on your working desk and some onto the dough. Use your hand to flatten the dough so that the big air bubbles inside could be released. Put the dough on the scale and evenly cut into 5 pieces. Rub the doughs into ball shape and cover them with plastic cling and let it cool for 15 minutes.
6. Flatten the dough and rub the dough into ball shape again, and let the dough to rise for the second time. It takes about 1 hour.
7. Put Pineapple streusel topping on each of the bread, press the edge slightly so that it is stick to the bread. 8. Brush some egg on the streusel topping and put it into the preheated 200 degree oven for 10-12 minutes.

2014年1月13日 星期一

Custard Bun 吉士忌廉麵包


上次做泡芙還剩下少少吉士忌廉,所以想要辦法消掉,做麵包有一個好處就是可以將家裡吃剩的所有東西都放進麵包一併焗,又不會浪費,又可以有早餐或茶點吃。


今次用了Carol 的食譜:

約做8個

材料:
  • 高筋麵粉 270g
  • 低筋麵粉 30g
  • 速發乾酵母 3/4teaspoon
  • 雞蛋 1隻
  • 鮮奶 140ml
  • 細砂糖 30g
  • 牛油 30g
  • 鹽 1/4 teaspoon
  • 吉士醬 適量 (做法可以參考這篇)
做法:
1.麵包外皮麵團做法請參考上一篇
2.第一次發酵完成的麵團分割成8等份滾圓(每個約65g),蓋上保鮮紙靜置15分鐘。
3.用麵棍將麵團壓成一個長寬約12cm的圓形,將適量吉士醬內餡放上。
4.將收口捏緊朝下,成為一個圓形。
5.包好的麵團間隔整齊排入烤盤中。

6.整盤放入烤箱中,麵團表面噴些水然後蓋上烤箱門,再發酵60分鐘。
7.發酵好前8-10分鐘,將烤盤從烤箱中取出,烤箱打開預熱至170度。
8.進烤箱前在發好的麵團上輕輕刷上一層全蛋液及擠上少許吉士作裝飾。
9.放入焗爐焗18-20分鐘。

2014年1月11日 星期六

Wubaochun Milk Loaf 吳寶春金牌牛奶吐司


不知道你知道吳寶春是誰嗎? 相信很多台灣朋友都知道他的威水史。 他是台灣奮鬥了二十多的麵包師博,2010年以荔枝玫瑰麵包參加世界盃麵包大師賽贏得冠軍! 回國後他在台北及高雄開設了自己的麵包店。他的故事在2013更被拍成電影- 世界第一麥方。三月的台灣之旅要買很多他的麵包好好吃。今次第一次用它公開的配方去做方包...

450g 麵包模

材料:

  • 高筋麵粉 300g 
  • 砂糖 24g 
  • 鹽 5g 
  • 牛油 15g 
  • 水 135ml 
  • 速發酵母 3g 
  • 牛奶 69ml 

1. 除牛油外,將所有材料倒入電動攪拌器(保留約30ml 水後加),先用低速打約2-3分鐘至沒有粉粒,再用中速打2-3分鐘成一個完整的麵團,中途慢慢加入保留的水,每次加水時要先轉低速攪拌再轉中速打,一路加水打至麵團十分柔軟。
2. 加入牛油,先用低速打1-2分鐘,待牛油跟麵團融合後,再轉中速打成有薄膜而不破爛的麵團,打25-35分鐘,中途要不時停機將黏在勾上的麵團刮下來再攪拌。時間每人都不同,重要的是形成薄膜。

3. 取出麵團滾圓底部向下,放置在抺上少許油的大盆中進行第一次發酵,蓋上保鮮紙,防止麵團表面吹乾,保持發酵的温度在28度左右。如果是夏天可以放在温室發酵,但如果冬天發酵就要放入微波爐加一杯暖水,令麵團保持在一個温暖的環境下發酵,如果水涼了就換另一杯取代。發酵時間大概1-1.5小時,發至原本麵團的2倍大。
4. 用手指測驗麵團,手指沾高筋麵粉,將手指插入麵團的中間,約數cm 的深度,如果沒有馬上彈回就代表可以。如果彈回就需要再發酵。
5. 取出麵團,桌上撒些高筋麵粉,麵團表面也撒少少,用手壓出大氣泡,磅重量,平均分兩份,各自滾圓,蓋上保鮮紙靜置15分鐘。

6. 壓平麵團成長方形捲起,蓋上保鮮紙靜置15分鐘。

7. 第二次壓平麵團成長方形捲起,寛度跟麵包箱的寛度相約,放入麵包箱中進行第二次發酵,同樣,如果冬天需要放在微波爐內加一杯熱水,發到9分满,約1-1.5小時。
8. 放入預熱200度的焗爐焗40分鐘。
9. 取出,連麵包模離枱敲在工作枱上,扣倒出麵包放涼切片。

Ingredients:

  • bread flour 300g 
  • sugar 24g 
  • salt 5g 
  • butter 15g 
  • water 135ml 
  • instant yeast 3g 
  • milk 69ml 
1. Except butter, put all ingredients into the mixing machine(keep 30ml of water for the later stage). Use a low speed to mix for 2-3 minutes until everything is combined. Use the medium speed to mix for 2-3 minutes until it forms a dough. During this process, add the remaining water slowly. Every time when u add water, turn to low speed first and turn to medium speed only after the water is well combined with the dough. Beat until the dough is very soft and smooth.
2. Add butter, use the low speed again and wait around 1-2 minutes until it is incorporated with the dough. Use the medium speed to beat the dough for around 25-35 minutes until the thin sheet is formed without breaking. While the machine is beating the dough, you have to stop the machine and clean the hook from time to time so that all the mixture is evenly kneaded. The key is to form the thin sheet.
3. Remove the dough from the machine, put it into a light buttered bowl and let it rise in warm place around 28 degree. Cover the dough by a plastic cling to avoid forming dry skin. If it is summer, you could let the bowl to sit in the room temperature. If it is winter, you need to put that into the microwave with a cup of hot water next to it to provide a warm and moist environment. If the hot water becomes cool, replace by another one. Let the dough to rise around 1- 1.5 hour or it doubles in size.
4. Use your finger to test the dough, stick your finger with some bread flour and put it into the dough around several cm depth. If the dough does not bounce back, it means ok. If the dough is very elastic and bounce back, then you have to let it rise for some more time.
5. Remove the dough from the bowl. Spread little bread flour on your working desk and some onto the dough. Use your hand to flatten the dough so that the big air bubbles inside could be released. Put the dough on the scale and evenly separate into two halves. Rub the doughs into ball shape and cover them with plastic cling and let it cool for 15 minutes.
6. Roll the doughs into rectangular shape and fold the dough and roll and let it cool with plastic cling covered for another 15 minutes.
7. Roll the doughs again into rectangular shape and fold the dough and roll with width slightly less than your bread baking mold. Put the doughs into the mold and put it into the microwave for the second time. Same as the first time, you have to put a cup of hot water inside if this is winter until the dough rise to nearly 90% of the mold.
8. Put it into a preheated 200 degree oven for 40 minutes.
9. Remove from oven, tap the bread together with the mold on the working surface. Remove the bread from the mold and let it cool and cut into slices.

2014年1月8日 星期三

Pâte à choux 吉士泡芙


自從吃過一間連鎖店的泡芙後,我就愛上吃泡芙,尤其是中間那個吉士醬,好吃到就算覺得肥都要一整個吃完。

因爲不幸地相機的記憶咭出問題,今次沒有過程的照片。

可以做6-7個約5cm 的泡芙
材料:

泡芙
  • 水 50ml
  • 室温牛油 23g
  • 高筋麵粉 30g
  • 雞蛋 1隻 (另外要少少蛋液掃在泡芙上)

吉士醬
  • 牛奶 125ml
  • vanilla extract  1/2 teaspoon
  • 蛋黃 1.5個
  • 砂糖 37g
  • 低筋麵粉 12g
做法:

泡芙
1.將水及牛油在鍋中煮至滾。
2.離火,加入已篩過的高筋麵粉,攪混。開火再煮,要不停用木棍攪直至形成一個麵團而且麵團不黏鍋子,大約1-2分鐘。
3.將麵團放在另一個大碗中待涼約5-10分鐘,如果太熱會令蛋液煮熟,一邊加蛋液一路攪拌, (我覺得用木棍攪就可以),加至大半隻蛋時要檢查麵團,如果麵糊流下時呈現倒三角的條就可以,如果太硬就可以再加少少蛋液攪拌再檢查,不要一次過全加,因爲太稀就不能成形。
4.入擠袋,在牛油紙上擠出泡芙,每個約5cm 直徑。 每個泡芙掃上少少蛋液作保濕作用,但掃太多就會影響膨漲,又或者用少許水都可以。
5.放入預熱180度的焗爐焗27-33分鐘。

吉士醬

1. 在鍋內放入牛奶,vanilla extract 及少量砂糖(牛奶10%重量),煮滾後離火。
2. 打散蛋黃,加入砂糖混合。
3. 加入過篩的低筋麵粉混合,直至沒有粉粒。
4. 先加入一半的熱牛奶攪混,加入餘下另一半再混合。
5. 過篩,在鍋內再次加熱,中途要用木棍不停搞,直至稠身custard 狀,熄火。
6. 倒入碗中,蓋上保鮮紙,保鮮紙要貼住custard 防止表面結皮,放入雪櫃。


Ingredients:

Pâte à choux

  • water 50ml 
  • room temperature butter 23g
  • bread flour 30g 
  • egg 1 (plus extra for brushing the puff)

Custard
  • milk 125ml
  • vanilla extract  1/2 teaspoon
  • egg yolk 1.5個
  • sugar 37g
  • cake flour 12g

Direction:

Pâte à choux
1. Heat the water and butter in a saucepan to boil.
2. Remove from heat, add sifted flour and stir. Heat it again until it forms like a dough and it does not stick to the saucepan. Keep stiring with a wooden spoon and it takes around 1-2 mins.
3. Put the dough in another bowl and let it cool for 5-10 minutes because the egg will be cooked if it is too hot. Add egg slowly and mix until incorperated. You have to check when you added around 3/4 egg, if the mixture goes down and forms like a triangle, then it is fine. If it is too hard, then add more egg. Do not add all the egg at one time otherwise the mixture will be too soft and cannot form a good sharp.
4. Put the mixture in a pipping bag and pipe a ball with around 5cm diameter. Bursh little egg on each puff to moisturize them but dont bursh too much otherwise it will affact the rising. You could also use water instead.
5. Put it into a preheated 180 degree oven for 27-33 mintues. 

Custard

1. Heat the milk, vanilla and a little sugar (10% of the milk ) to boil and remove it from heat.
2.Whisk the egg yolk, add sugar and mix.
3.Add sifted cake flour into egg yolk mixture until incorporated.
4.Add half of the hot milk into egg yolk mixture and mix, and then add the rest and continue to mix.
5.Use a sieve to filter the mixture and pour in back into the saucepan and heat, keep stirring with a wooden spoon until it thickens like custard and remove it from heat.
6.Pour into a bowl and cover it with plastic cling. The plastic cling needs to stick to custard directly to prevent it from forming skin. Put it into refrigerator.

2014年1月7日 星期二

Koyama Roll 小山蛋糕捲


小山蛋糕捲是小山進很有名的其中一件蛋糕,曾經在日本一天賣出3000條。小山進是日本電視冠軍節目糕點烘焙大賽中拿過最多冠軍的甜點大師,他的店面不開分店,全日本就一家,店面位距離大阪一個多小時的三田市,不過仍然很多人去朝聖,希望在下個大阪之旅我可以吃一整條小山蛋糕捲!

30 x 24 cm 烤盤

出自小山進<好吃的西點蛋糕祕訣>

材料:

蛋糕體

蛋黃 96g
砂糖 12g
蜂蜜 24ml
低筋麵粉 56g
蛋白 128g
砂糖 52g
牛油 12g
牛奶 28ml

塗層用克林姆

巴迪西克林姆 32g
忌廉 96ml
糖粉 7g

克林姆慕斯
巴迪西克林姆 24g
忌廉   8ml

巴迪西克林姆
牛奶 56ml
蛋黃 10g
砂糖 12g
低筋麵粉 2g
粟粉 2g
vanilla extract 1/4 teaspoon
牛油 4g

做法:

蛋糕體


  1. 將蛋黃及12g砂糖混合,加入已加熱至40度的蜂蜜,打發至淺黃色。可以插一枝牙籤測試,如果可以挺立就OK。
  2. 將蛋白打發起泡,52g砂糖分三次加入,繼續打發至蛋白霜尾部下垂。
  3. 將一半的蛋白霜加入蛋黃糊中輕輕拌勻,再加入過篩的低筋麵粉,再將剩下的蛋白霜加入輕力混合。
  4. 加入已加熱約80度的牛奶及牛油拌勻。
  5. 倒入鋪上牛油紙的焗盤上,放入預熱180度的焗爐焗13分鐘。
  6. 取出,連同焗模一起在枱上放手一敲(離熱枱20cm 左右),撞出熱氣,連牛油紙取出蛋糕在涼架上放涼,撕去四邊的牛油紙。
  7. 待涼後,在蛋糕上蓋另一塊牛油紙,雙手拿住兩張牛油紙的頂部,反手反轉蛋糕,將底部的牛油紙撕去。

巴迪西克林姆
  1. 在鍋內放入牛奶,vanilla extract 及少量砂糖(牛奶10%重量),煮滾後離火。
  2. 打散蛋黃,加入砂糖混合。
  3. 加入過篩的低筋麵粉及粟粉混合,直至沒有粉粒。
  4. 先加入一半的熱牛奶攪混,加入餘下另一半再混合。
  5. 過篩,在鍋內再次加熱,中途要用木棍不停搞,直至稠身custard 狀,熄火。
  6. 加入牛油用餘温混合。
  7. 倒入小碗中,蓋上保鮮紙,保鮮紙要貼住custard 防止表面結皮,放入雪櫃。 

塗層用克林姆
  1. 糖霜加入忌廉打發至八分 (可以一次過連克林姆慕斯內的忌廉一起打發)。
  2. 先用少許忌廉跟巴迪西克林姆混合,再跟其餘的忌廉拌勻。
克林姆慕斯
  1. 打發好的忌廉跟巴迪西克林姆混合。

組合
  1. 先將塗層用克林姆塗在蛋糕上,其中一邊留約3cm 的空位作爲蛋糕的尾部。
  2. 將克林姆慕斯入擠袋,在蛋糕的另一端擠出一長條,這邊爲蛋糕的開端。
  3. 用木棍的幫助下如捲壽司一樣捲起蛋糕。
  4. 放雪櫃一小時後享用。


Ingredients:

Cake roll 

egg yolk 96g
sugar 12g
honey 24ml
cake flour 56g
egg white 128g
sugar 52g
butter 12g
milk 28ml

Cream 

custard 32g
cream 96ml
icing 7g

Custard cream
custard 24g
cream  8ml

Custard
milk 56ml
egg yolk 10g
sugar 12g
cake flour 2g
corn flour 2g
vanilla extract 1/4 teaspoon
butter 4g

Direction:

Cake roll

  1. Mix egg yolk with 12g of sugar and whisk, add preheated to 40 degree honey slowly and continue to whisk until it becomes pale color. You could use a toothpick to test, if it could stand in the egg yolk mixture, it s ok. 
  2. Whisk egg white to bubble stage and then add 52g sugar (divided it into three times to add), whisk until soft peak stage and fluffy. 
  3. Add half of the meringue into the egg yolk mixture and fold in, and then add sifted cake flour and fold in until they are incorporated, next, add the remaining meringue and mix until incorporated. 
  4. Add preheated to 80 degree milk and butter and mix.
  5. Pour into the baking tray(with baking sheet), and put it into a preheated 180 degree oven for 13 minutes. 
  6. Take out the cake roll and tap the cake roll together with the baking tray onto your working desk (above 20cm of your desk height) so that it could release the heat inside the cake roll. Move the cake roll from the baking tray and let it cool. 
  7. Put another baking sheet on top of the cake roll, use both hand to hold both sheets and turn the cake roll upside down so that you can remove the baking sheet originally sticking to the cake roll.
Custard
  1. Heat the milk, vanilla and a little sugar (10% of the milk ) to boil and remove it from heat. 
  2. Whisk the egg yolk, add sugar and mix. 
  3. Add sifted corn flour and cake flour into egg yolk mixture until incorporated. 
  4. Add half of the hot milk into egg yolk mixture and mix, and then add the rest and continue to mix.
  5. Use a sieve to filter the mixture and pour in back into the saucepan and heat, keep stirring with a wooden spoon until it thickens like custard and remove it from heat.
  6. Add butter into the custard and mix.
  7. Pour into a small bowl and cover it with plastic cling. The plastic cling needs to stick to custard directly to prevent it from forming skin. Put it into refrigerator.  
Cream
  1. Add the icing sugar together with the cream and whisk until firm peak. (You could whisk the custard cream together).
  2. Mix a little cream with the custard until incorporated and then fold in the rest of the cream together.
Custard cream
  1. Mix the cream and the custard together.
Combination
  1. Whip the cream on top of the cake roll, leave around 3 cm width area without any cream at either of the edge of the cake roll and that side will be the end of the cake roll.
  2. Put custard cream in a pipping bag and pipe a long straight line on the other edge of the cake roll and it will be where you start to roll the cake roll.
  3. With the help of the wooden stick, roll the cake roll like you roll the sushi roll.  
  4. Put it into the refrigerator for 1 hour.

2014年1月5日 星期日

Passionfruit and banana souffle 熱情果香蕉梳乎厘


廚神Gordon Ramsay 話到souffle 是no.1 的showoff 甜品,尤其是在假日的親朋戚友的私房飯焗上,不過這個show off 只有數分鐘的曇花一現,還是趁熱快快享用較好。


可以做5 杯 (杯底直徑2.5吋)
可以直接看Gordon Ramsay 的youtube


材料:
  • 熱情果茸 50ml
  • 香蕉 50g (約半條)
  • 牛奶 75ml
  • 忌廉 50ml
  • 砂糖 70g (一半蛋白用,一半蛋黃用,再加適量砂糖掃在模身)
  • 蛋黃 30g
  • 麵粉 7g
  • 粟粉 7g
  • 蛋白 70g
  • 室温牛油 適量


1. 先將牛奶及忌廉煮熱。
2. 砂糖加入蛋黃用打蛋器打發至淺黃色,加入已篩過的麵粉及粟粉攪混。
3. 加入兩至三湯匙的熱牛奶忌廉入2拌混,再慢慢加入其餘的熱牛奶忌廉,再放入小鍋中煮至稠身custard ,其間要不停用木棍或打蛋器攪混。


4. 熱情果茸加入香蕉用攪拌機打至奶昔狀,加入3拌混。
5.牛温用掃塗在模內,由杯底掃上杯頂,四周掃混,令杯身內隠約看見一條條直身的牛油痕跡,可以令souffle 上升得更高,再加入砂糖粒,轉杯身令砂糖鋪滿在牛油上,將多餘的砂糖倒在下一個模內,放入雪櫃雪5分鐘令牛油凝固。

6.蛋白分三次加入砂糖打發至蛋白霜尾部挺立。
7.. 先將三分一的蛋白霜加入熱情果香蕉custard ,大力攪混,再分兩次加入蛋白霜,輕力用刮刀拌混。
8. 先倒一半在模入,在布上敲杯令custard 糊平均流到杯的每一個角再,再倒入另一半,最後用刀平刮平杯頂,可以令焗完的效果表面平滑。用手指公沿邊刮custard 糊一圈,可以令souffle 在焗的途中不會黏住模邊影響上升。
9. 放入預熱180度的焗爐焗10-13分鐘。
10. 要趁熱享用!

Ingredients:

  • Passion Fruit Puree 50ml 
  • Banana 50g (half of the banana) 
  • Milk 75ml 
  • Cream 50ml 
  • Sugar 70g (half for egg white and half for egg yolk plus extra sugar for the mold) 
  • Egg yolk 30g 
  • Cake flour 7g 
  • Cornstarch 7g 
  • Egg white 70g 
  • Room temperature butter little 
Direction:

1. Bring the milk and cream to boil in a saucepan.
2. Whisk the sugar and egg yolks together until pale yellow colour, add the sifted cake flour and cornstarch to the egg yolk mixture. 
3. Add two to three tablespoons of hot cream and milk mixture into 2. and mix, then slowly add the remaining hot cream and milk mixture and whisk, pour everything back to the saucepan and cook until it thickens like custard form, keep stirring with a whisk or wooden spoon during heating. 
4. Mix banana and passion fruit puree together in liquidizer until it becomes smooth like milkshake and then add to 3. 
5. Butter the ramekins properly, brush from the bottom to the top of the ramekins and you could see vertical butter strokes inside the ramekins and this could help the soufflé to rise during baking. Next, spoon the sugar into the first ramekin and turn it around so that the sugar stick and cover the butter. Pour any excess sugar into the next mould until you finish all. Chill the moulds into the refrigerator for 5 minutes to solidify the butter. 6. Whisk the egg white and add sugar (divided into 3 batches) until it is thick, shinny and fluffy. 
7. Add one third of the meringue to the passion fruit banana custard, mix vigorously, and then add the rest of the meringue, mix gently mix with a spatula. 
8. Pour half of the mixture into the mould, and then tap on the work surface to get rid of any air bubbles and make sure all the mixture flow into every corner of the mould, then pour the other half until ramekin is full. Use the blade of the knife to flatten the surface of the ramekin so that you will have a very flat top soufflé. Finally, use your finger to run around the edge of the mould to prevent the soufflé to stick to the ramekin when it rises. Put the soufflés into a preheated 180-degree oven for 10-13 minutes.